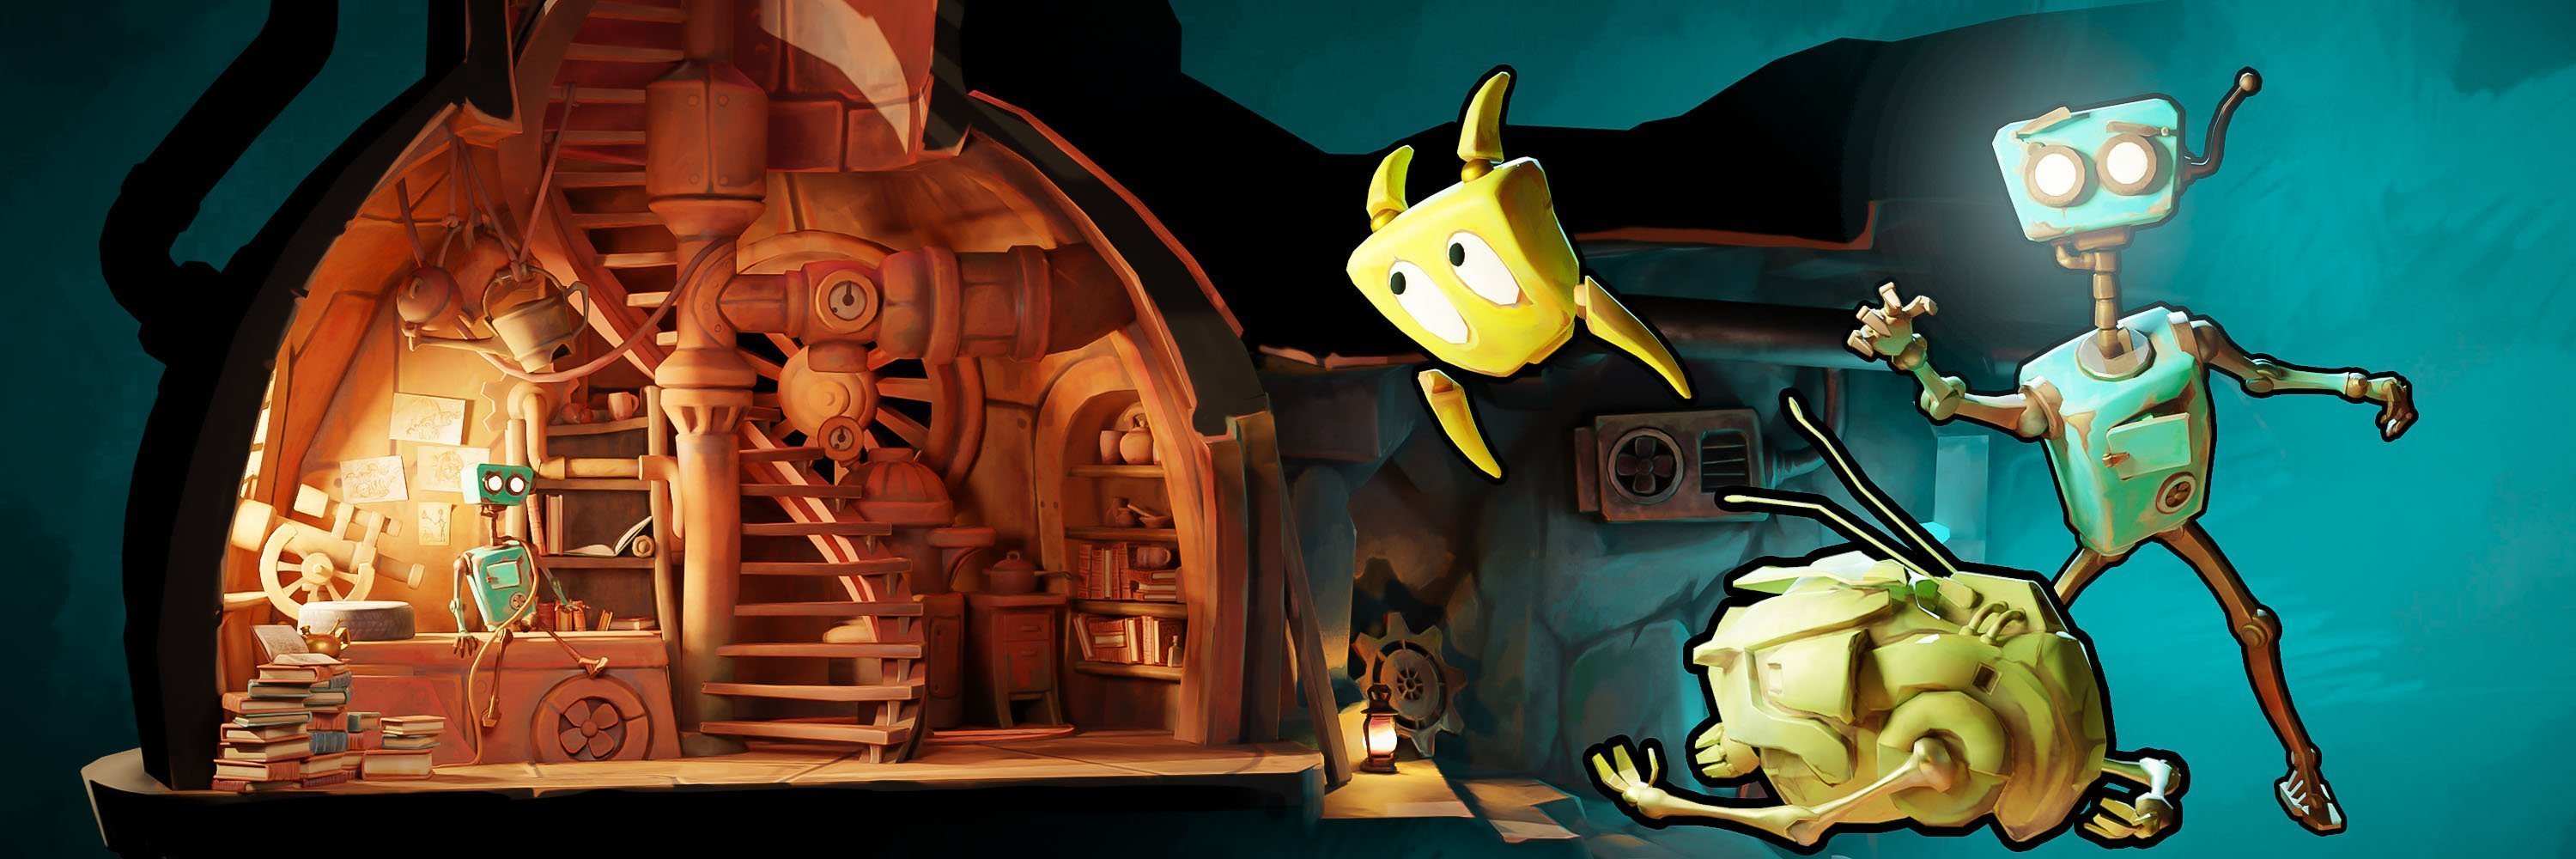
The team
Conrad Justin, Poland. 11 years of creating game environments, composing music, drawing and making a variety of commissions. Project Spark was one of my biggest initiatives and throughout a year I developed its style, theme, characters, props and environment. Responsibilities: Director, Character Design, 3D artist, Environment Art, Animator.
Igor Puskaric, Croatia. 15 years of 3D adventures, my strongest suits being 3D concept art, animation and design, also including illustration and various game projects. Along this project specifically, one of my utmost personal favorite career and social events was getting my “Worker 12” animated 3D model, becoming the Sketchfab’s front page 3D model! I was brought to this project by the strong passion for creativity and a spiritual push to adventure with Conrad and other Masters. My main responsibilities in this lovely creative togetherness were: Lead Animator and support 3D artist.
Terrie Simmons-Ehrhardt, U.S. Mostly working with biomedical images and 3D scans. Project Spark was an opportunity for me to be more creative and to learn new skills. My contributions were small (some bones and gears), but they challenged me to think about making 3D models low poly and topologized for texturing, something I never have to worry about when modeling bones for 3D printing! Responsibilities: 3D artist
Chaitanya Krishnan, India. 17 years in the industry. Freelancing and doing full-time jobs at design studios and then co-founding a film+animation studio, I decided that my calling was in experimentation and education. When the idea of Project Spark was proposed, I knew that this was something I needed to be a part of. Responsibilities: 3D artist, repository.
Dark-Minaz, Cambodia. Freelance 3D Artist that mainly uses Maya, Substance, and 3DCoat and doing a small project on Sketchfab that I like to call the Digital Armory. For this project I only had a very small part due to time issues but seeing the Team progress was a joy. Responsibilities: 3D artist.
Tycho Magnetic Anomaly, Ireland. Inspiration and support.
Tools and limitations
For all aspects of design (from storyboarding, texturing, animation to modeling, light and simulation) Blender was our main tool. Krita and Photoshop were crucial texture creation tools. Add-ons for Blender that we used were UVPackmaster, Mesh: F2, and Mesh: LoopTools, all of which are wonderful extensions. As for the media – we chose Sketchfab with all its pros and cons. Sketchfab is the best at what it does but its real-time engine has to perform well on the web, which means limitations—limitations we needed to tackle.
- Low poly budget
- Low texture budget
- Animation restrictions
- Lighting limitations
So many restrictions! How is it even possible to do big projects and longer animations with all of those? Well, read on and you will find out! ;)
Rough beginnings
The idea arrived during one of our (Sketchfab Masters) monthly meetings with the Sketchfab staff. Justin suggested that together we could make a cute little short movie in the spirit of Lily & Snout. Back then we didn’t know that this would be such an ambitious project and that it would take a whole year to finish it. Unaware of incoming dangers we agreed: “Let’s do something together!”
10 people signed up and were motivated to begin working on… nothing. We didn’t have a plan. We just had a bunch of keywords (“robots”, “cute!”, “short”) and the Grand Vision – ‘I do a small scene, send it over and another person adds something to this scene, sends it over and this continues until we have something cool!’. This of course resulted in the complete holdup of the project. Some people dropped out and almost nothing was made for a whole month. We were rescued by Phil and his plan: he told us we needed a story first. Not very spontaneous or artsy but we decided it’s worth a shot.
The adventure begins
Based on everyone’s ideas, a short and episodic story was written (potential sequels to come). Justin drew multiple drawings and sketches to determine the world and characters. When designing the theme and style of the movie we looked at the game Machinarium (Jakub Dvorský), the movie Howl’s Moving Castle (Studio Ghibli), and the Sketchfab scene Mechanical Trolling (Sy-kim – absolutely lovely scene!).
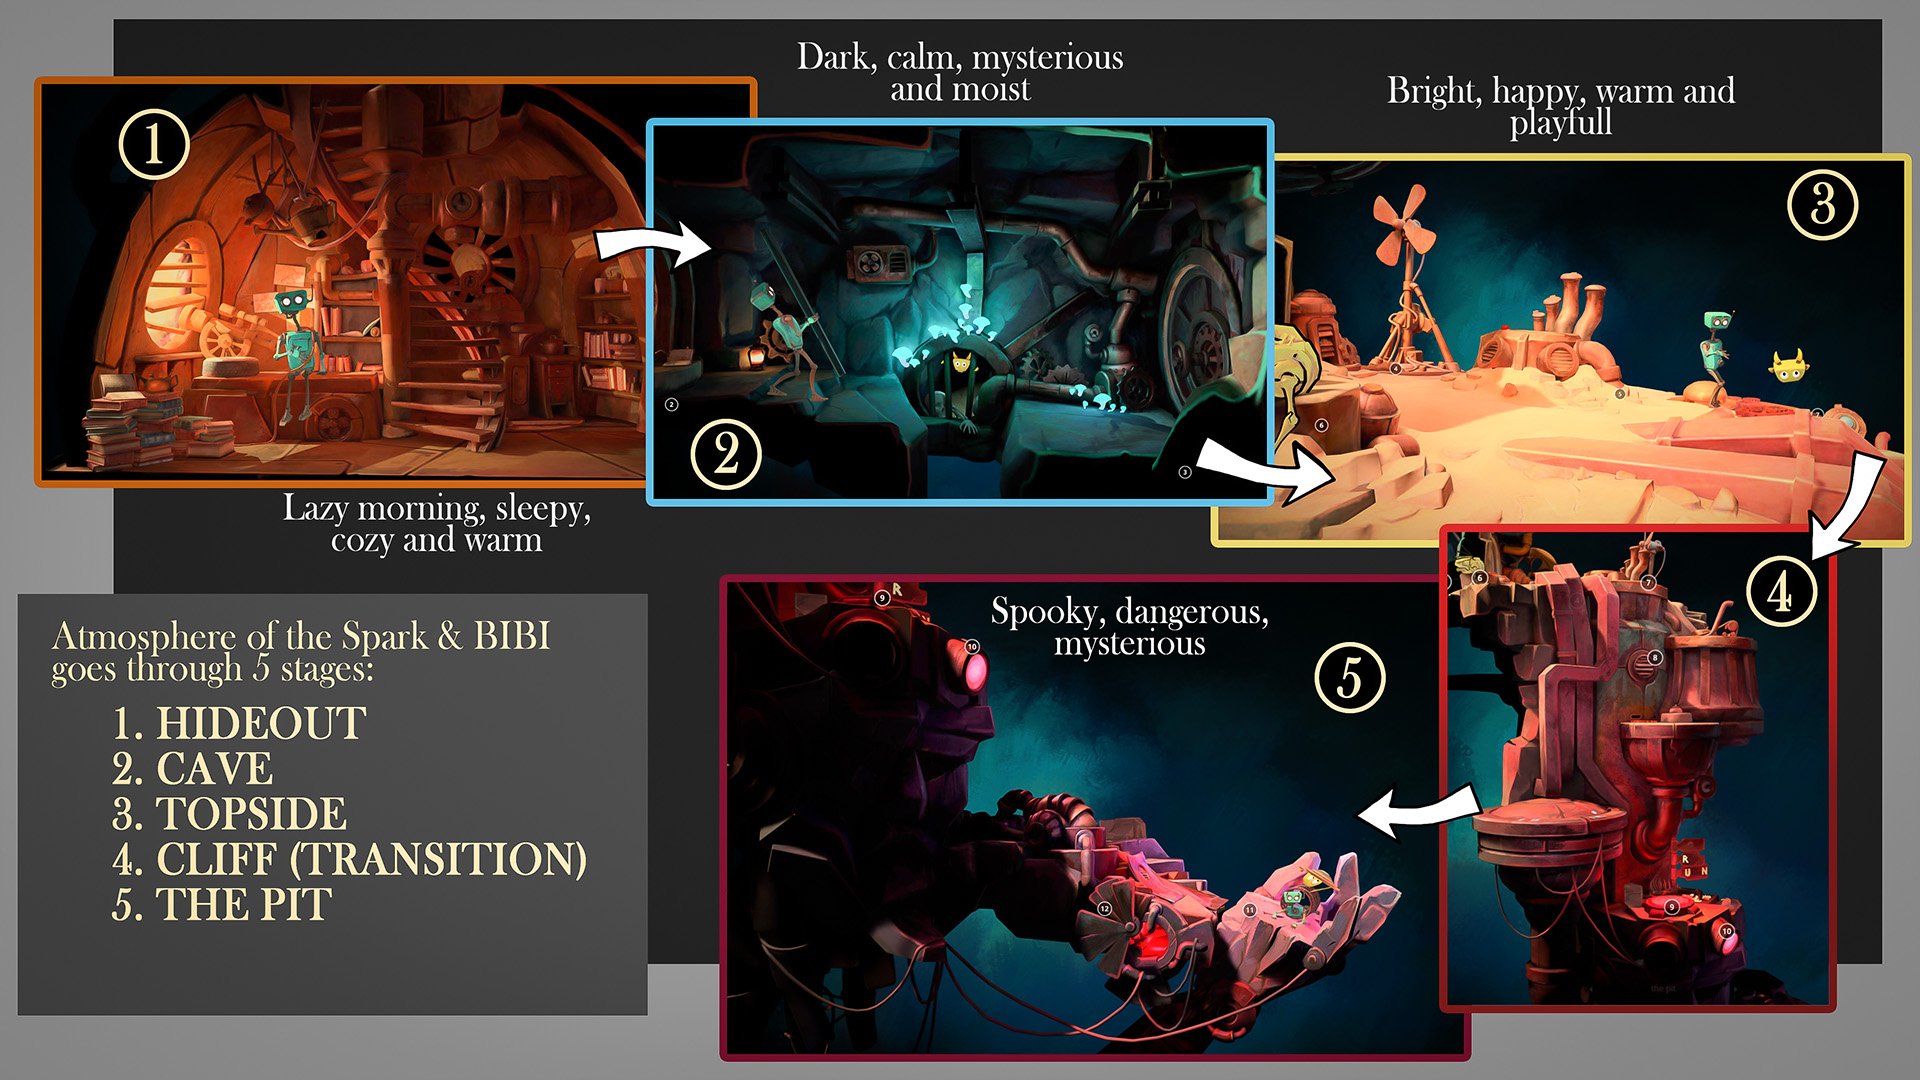
The viewer experience was to be linear – start at the top left (Spark’s hideout) – end all the way on the bottom right (Giant’s hand). The environment was supposed to be explored together with robots, bit by bit. The viewer (you!) would go through different stages and emotions and (hopefully) laugh once or twice during the adventure.
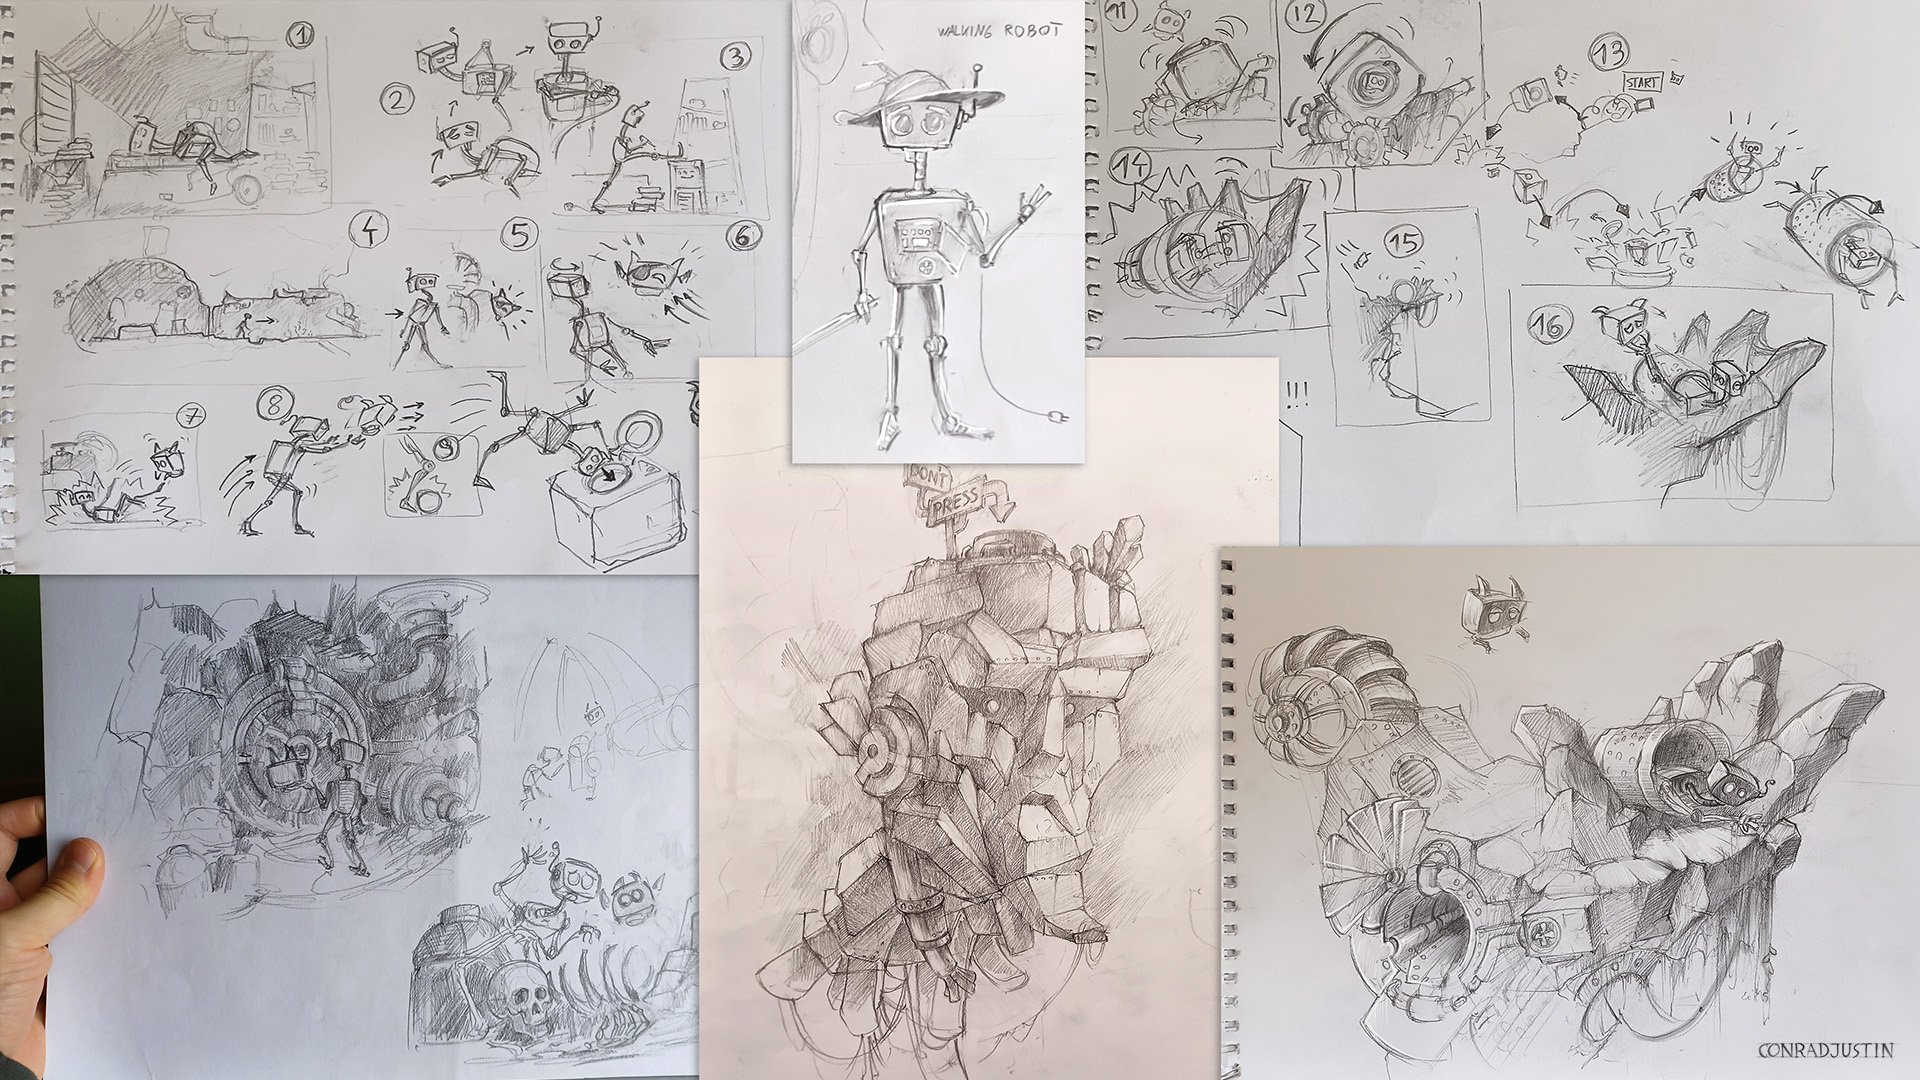 Storyboarding initially as sketches. When the block-out was finished – grease pencil story was drawn in the 3D space.
Blocking it out
Block-out (simple, textureless geometry) was the foundation of this project. It went through multiple iterations. The first version was still made before any concrete story was developed. It looked a bit like a “bunch of nothing” but it set the theme and style of the Martian junkyard. Quickly becoming obsolete, it transformed into something more linear and refined (imagine a path in a game level). The block-out revolves around (and determines) the path robot characters take. Story, objects and their topology, as well as texture resolution is directly influenced by that path.
 Block-out evolution throughout the year. It was driving the story as much as the story was driving it.
Visual storytelling and atmosphere
Color, light, space and theme dictate the atmosphere of the scene. It begins with the lazy morning in the small hideout, calm and soothing with orange light… Rust and wear indicate that this hideout was inhabited for a long time. Tight space and various personal objects keep it cozy and quaint. The cave transitions into darker and cooler tones. With light coming from a lantern and a bunch of glowing mushrooms, it feels mysterious and magical. The skull in a sewer makes it a little bit spooky. Geometry and lighting lead towards a giant hatch, making the viewer feel anticipation. Outside there is space and air and happiness (yellow, bright, warm colors) full of energy and joy. There is creativity and playfulness suspended in the air. The last part brings us into the dark and gloomy pit. Colors are dangerous, dark and cooler reds and magentas suggest the supernatural or magical. Bones, tangled ropes, and strong contrast are designed to make the viewer feel uneasy.
Detailed geometry
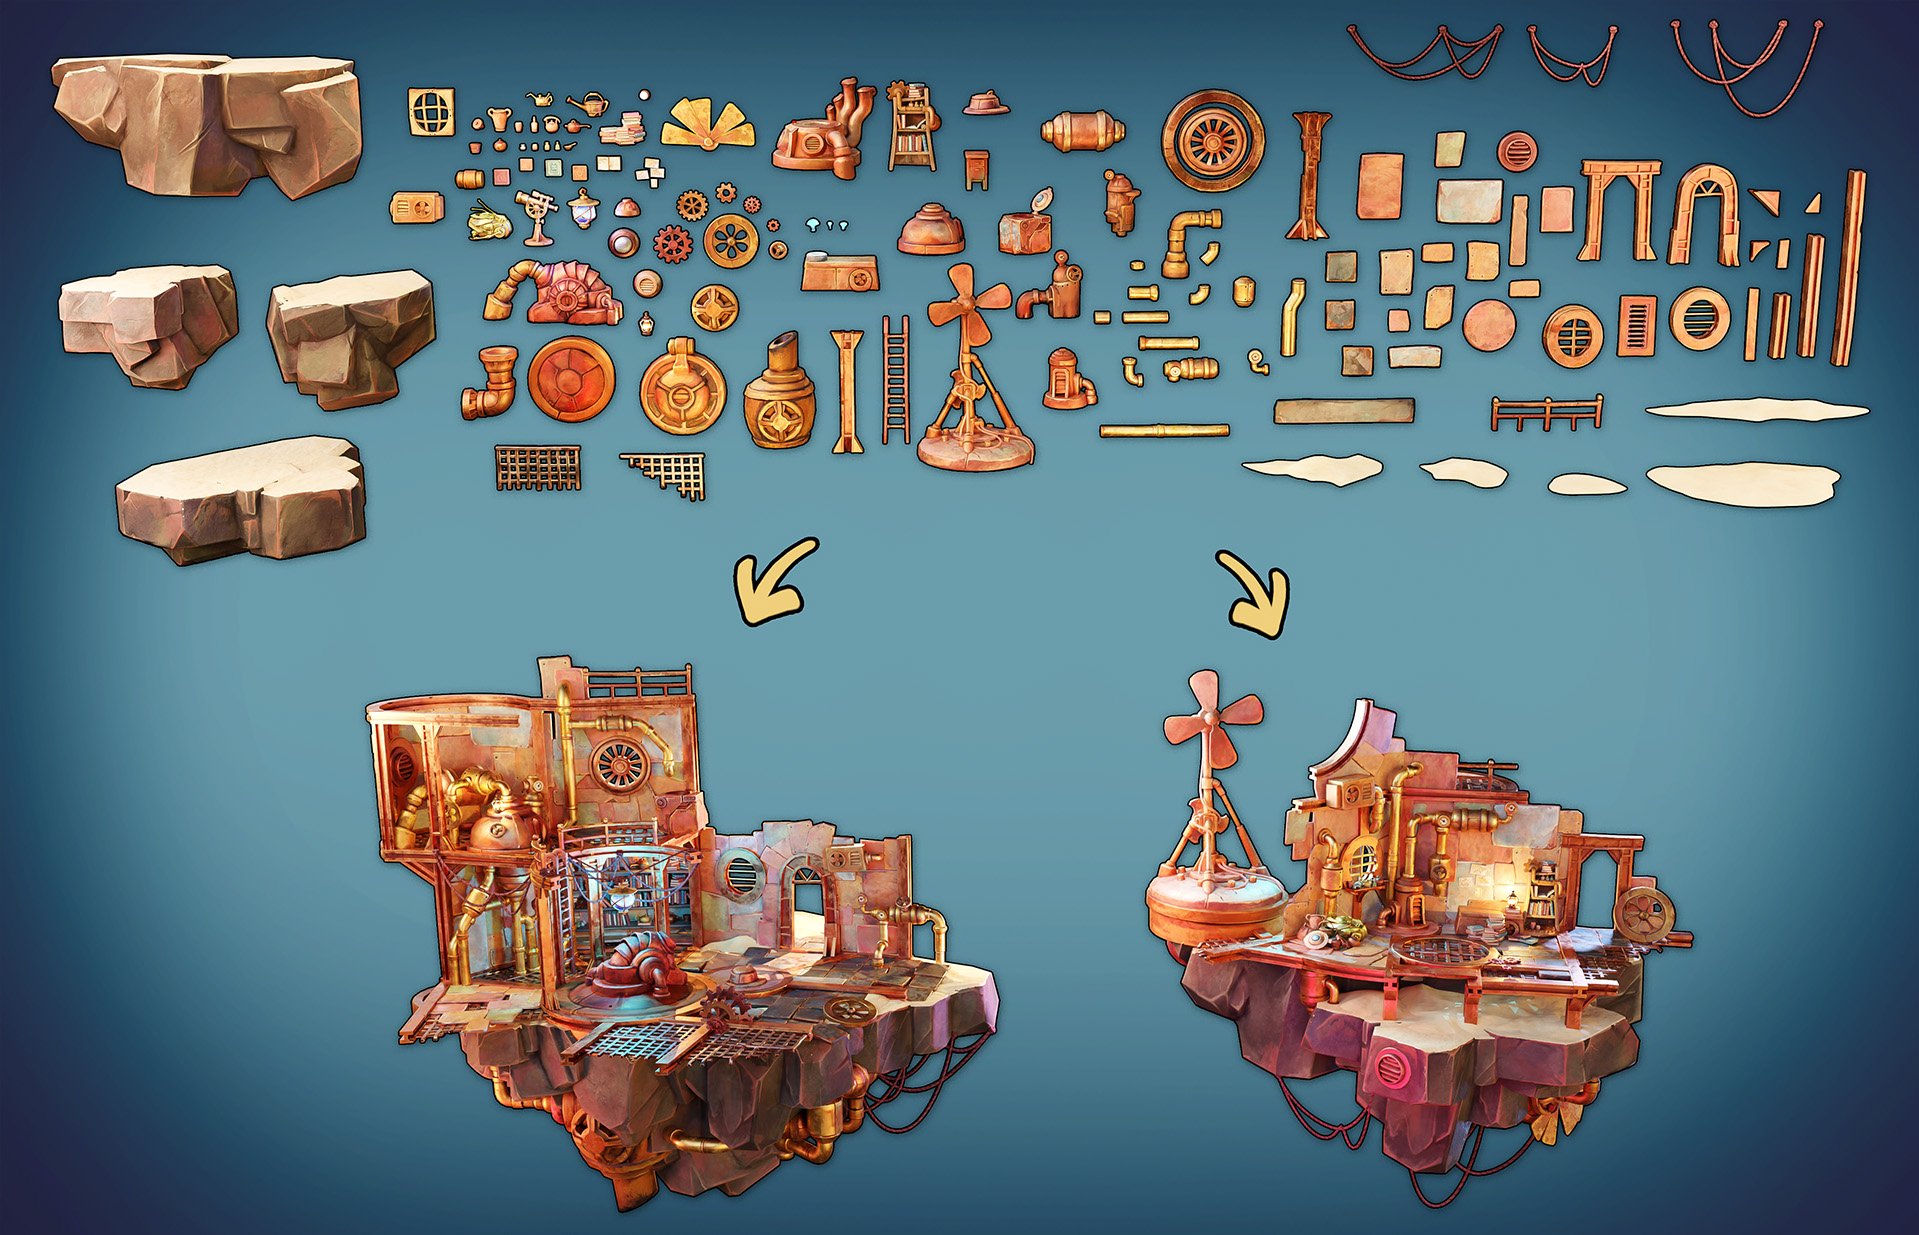
After the block-out was finished, all models were separated into four main groups: robots, Spark’s lair, tunnel, and outside. All model instance duplicates were placed on a large sheet next to the scene itself (image below). This way the team could work on particular models (without altering the scene itself) and it would automatically update their counterparts within the scene. In the end this idea was abandoned as it was faster and better to work within the scene, not outside of it. That is because distribution, proportion and arrangement of objects are more important than the quality of the individual assets. The overview wasn’t a complete waste – it proved useful when converting the scene into an asset pack.
Hopefully by the time you are reading this the asset pack with models from this project will have been finished! Models in it are optimized and assembled in a modular way allowing for many different designs. If you are interested, check it out on Conrad Justin’s Sketchfab account. It’ll be a great boost for us to develop future episodes of Spark & Bibi!
Topology budget
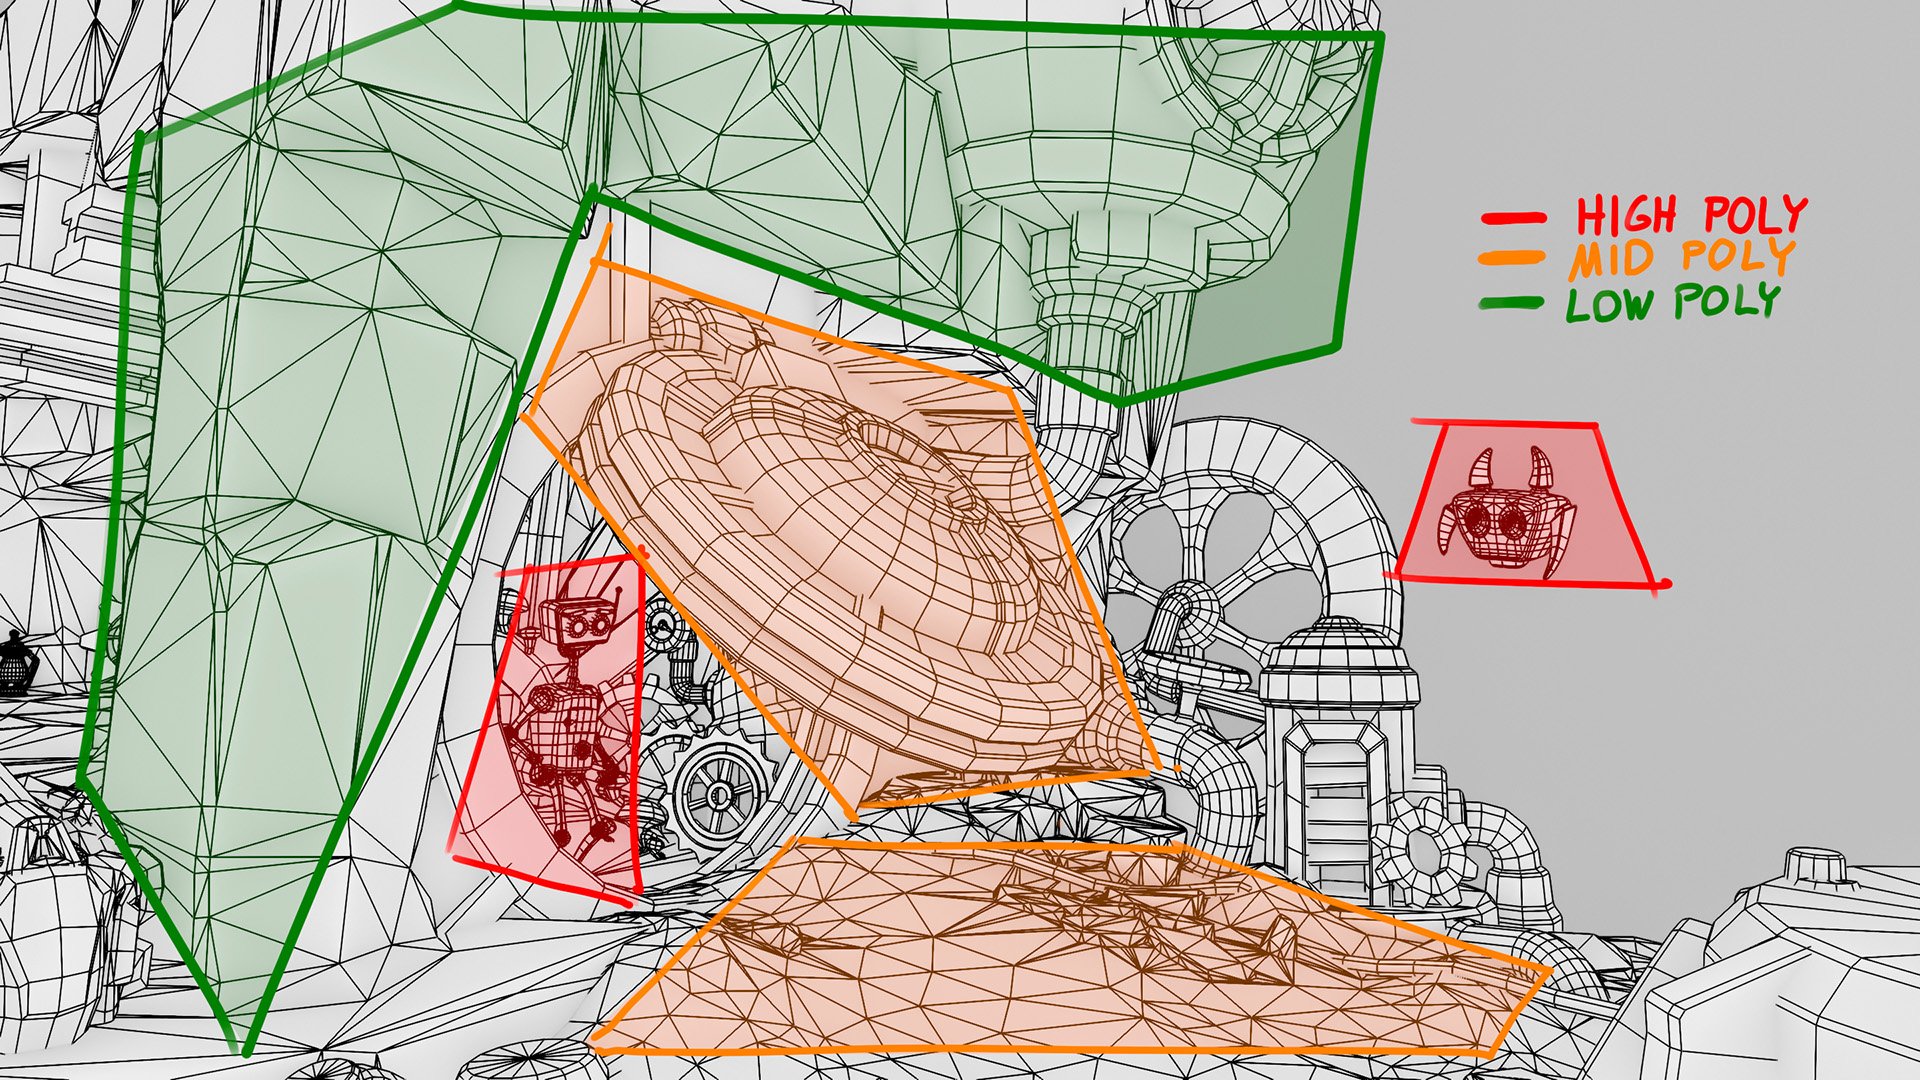
We knew that the project was going to stay within the topology thresholds so we focused on form and the silhouette of objects. We still kept the topology low to avoid it becoming a bottleneck for performance. On the animated and weight-painted models we used quads (but having some triangles here and there). Ngons (faces with more than 5 edges) are to be avoided on the models animated with bone rigs or morphs but for the static geometry they are fine. Topology was distributed in a way that it is of the highest density on the characters and the path around them and of lowest density where it’s dark and remote.
A neat trick for having high-quality normals while keeping topology low is using the Weighted Normals modifier. It requires important edges to be beveled. Using this method allows for reducing the amount of so-called ‘support edges’ – edge loops that determine how ‘sharp’ the rims and cavities of the model are. The resulting normals will be much more refined despite the low poly count of the model. Where we needed to strengthen the effect for particular faces, we set their ‘face strength’ to ‘strong’. This adjustment results in bigger weight for the vertex normals to respond to. Take a look at the screenshot below for a visual explanation.
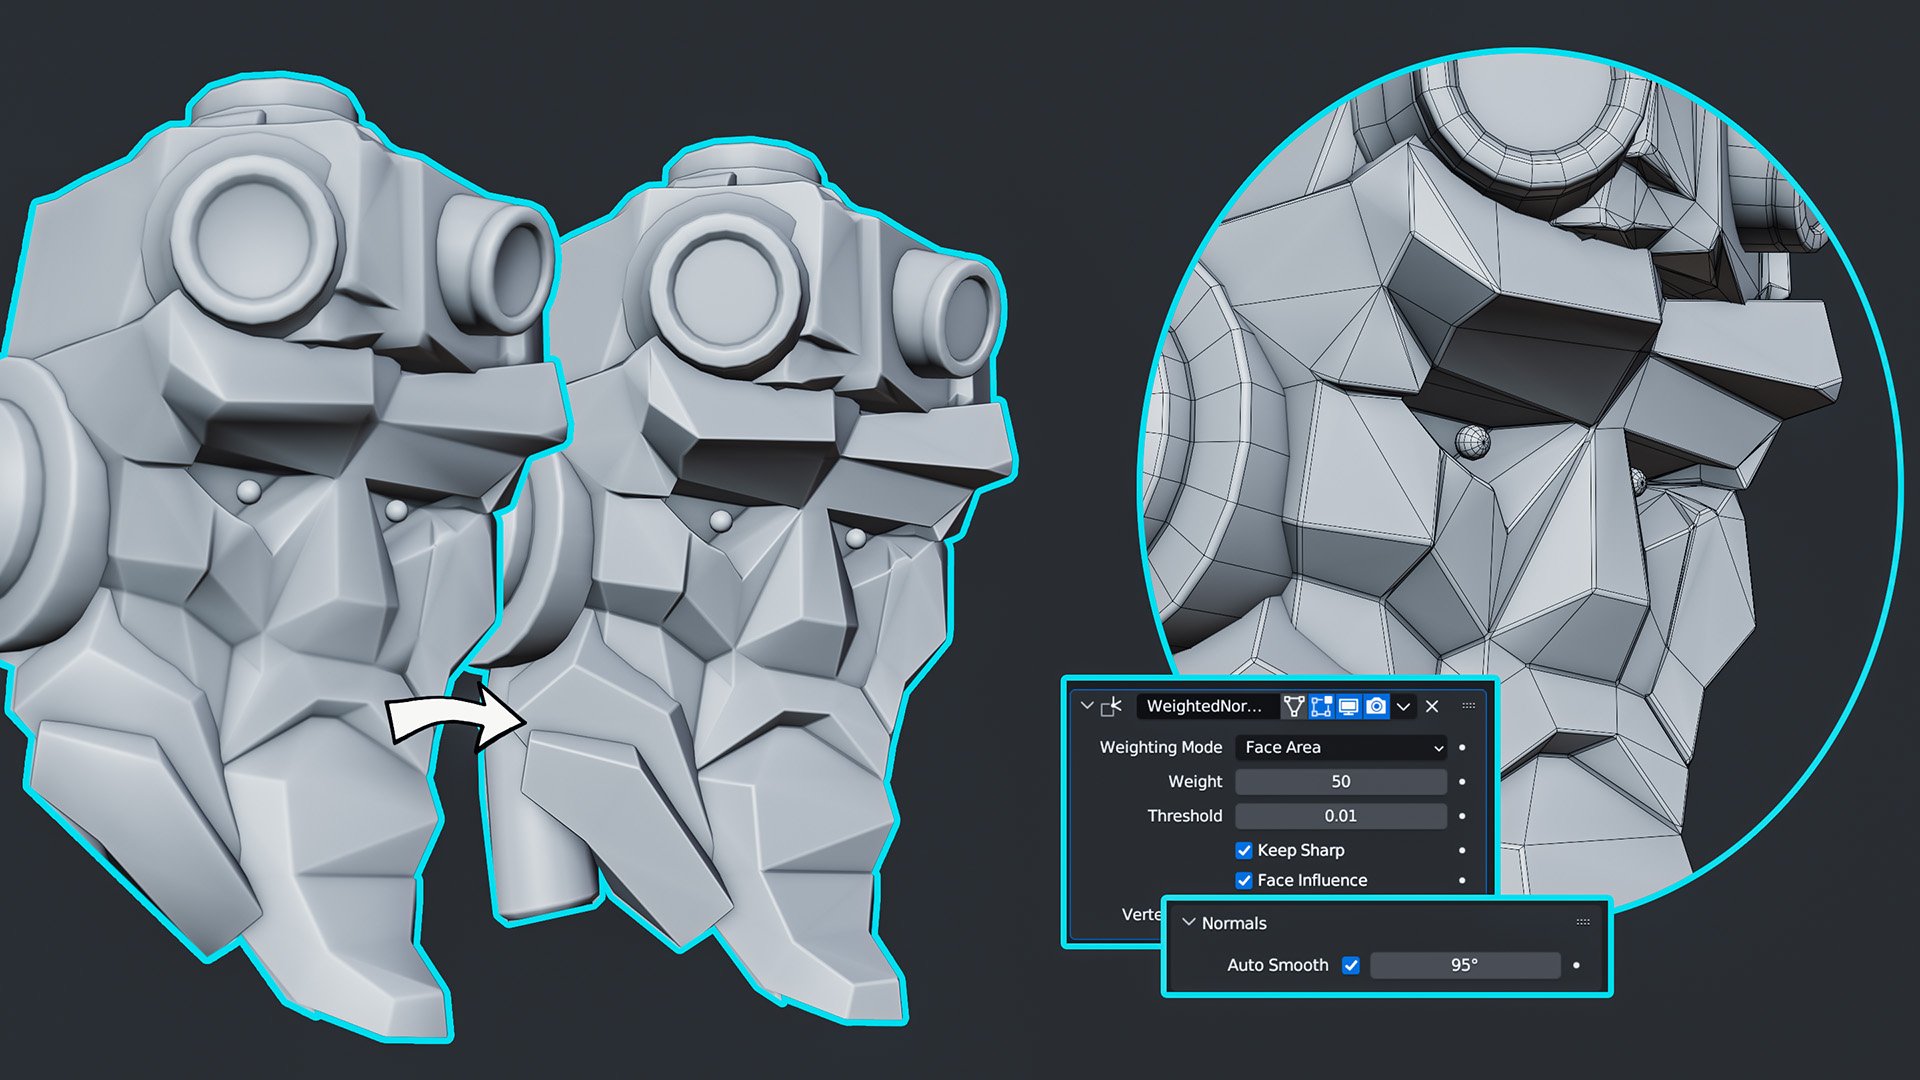 Using the Weighted Normal modifier to refine the ridges, valleys and flat surfaces allows for lower poly amount.
Texture budget
If you want your textures to preview at the resolution you uploaded them, you need to make sure all of them can fit within the square of 12288×12288 pixels (this is equivalent to nine 4k textures – or 36 2k textures).
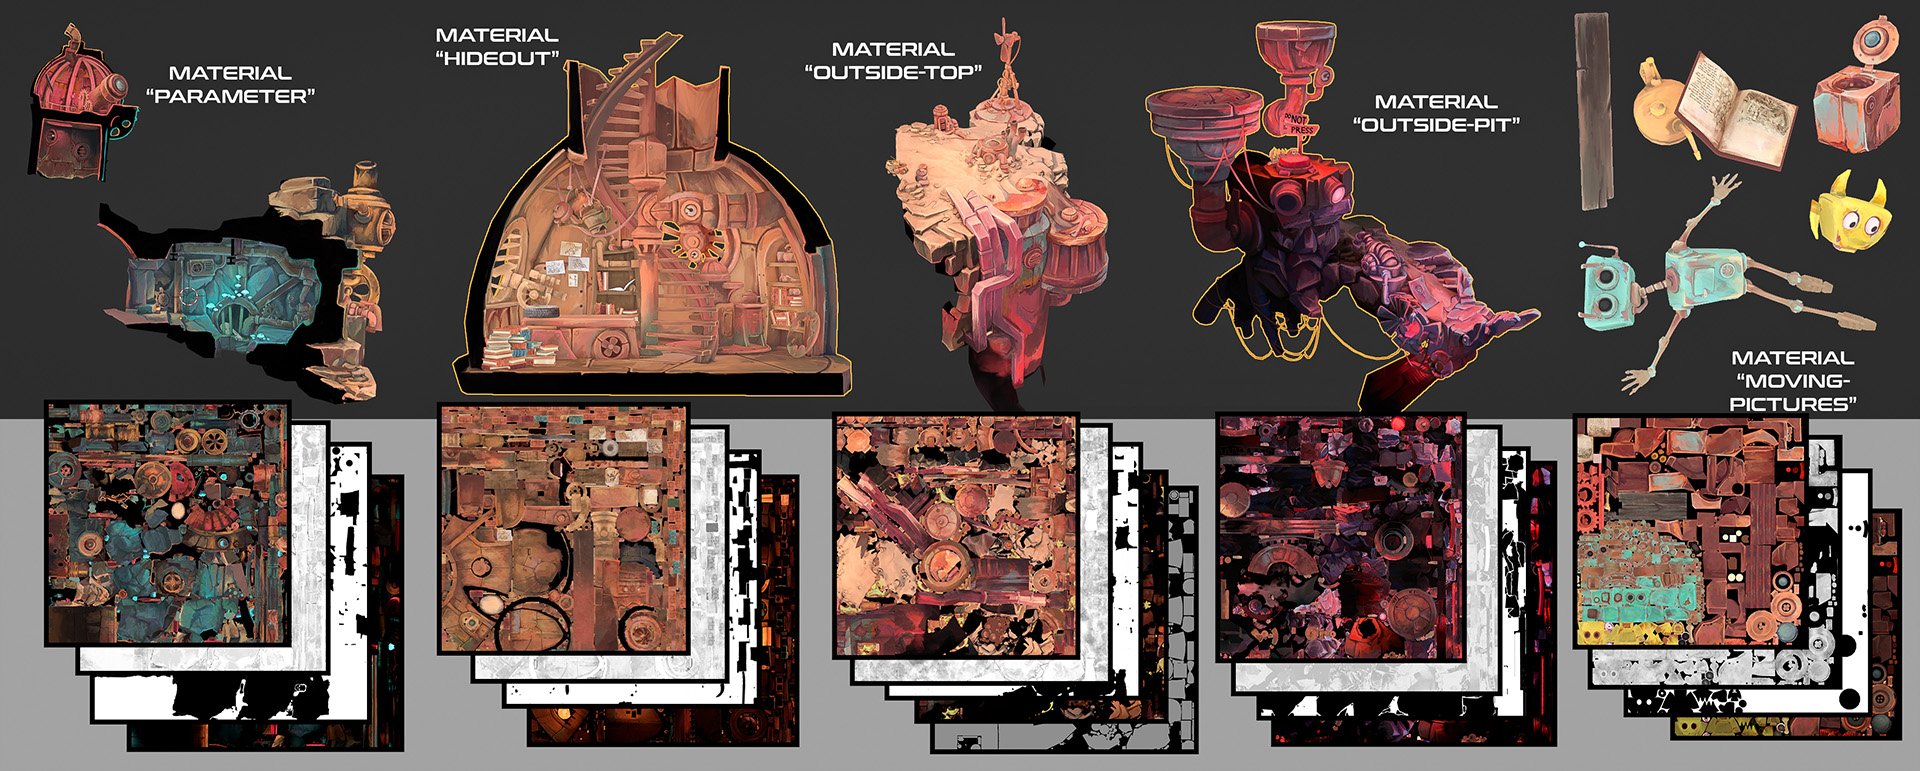
Considering the texture budget, all geometry was divided into just five main materials (each having four textures – diffuse, roughness, metallic, and emission). This was accomplished with large texture atlases, organized in a way that made most sense (clusters of geometry, separated moving objects). Most detail was painted on the protagonists and objects they directly interact with (higher texel density). As the resolution goes, all our 4k textures were reduced to 15 x 2k textures, 8 x 1k textures and two 512px textures to fit within the Sketchfab HD limit. Some of the materials also had a specularity mask to control highlight strength (for shadowy parts where we wanted to preserve darkness, specularity was reduced)
As you can see, diffuse has some light painted in. This technique allows for a more stylized look and strong visual identity but at the same time makes assets less modular (e.g., the pipe from the cave would look bizarre outside, where the lighting is completely different). Having a ‘touch of light’ included in the diffuse (one of the PBR maps) requires that it is painted smartly and with care (you shouldn’t paint strong contrast and direct shadows, but rather soft AO and indirect light bounces and remember to paint metal parts brighter than you’d think). In such a workflow, it is good to decide the atmosphere and lighting before you begin painting. The restriction of baking light is the fact that UV islands of those materials can’t have any overlaps. To pack UVs, the UVPackmaster addon was used.
Light limit
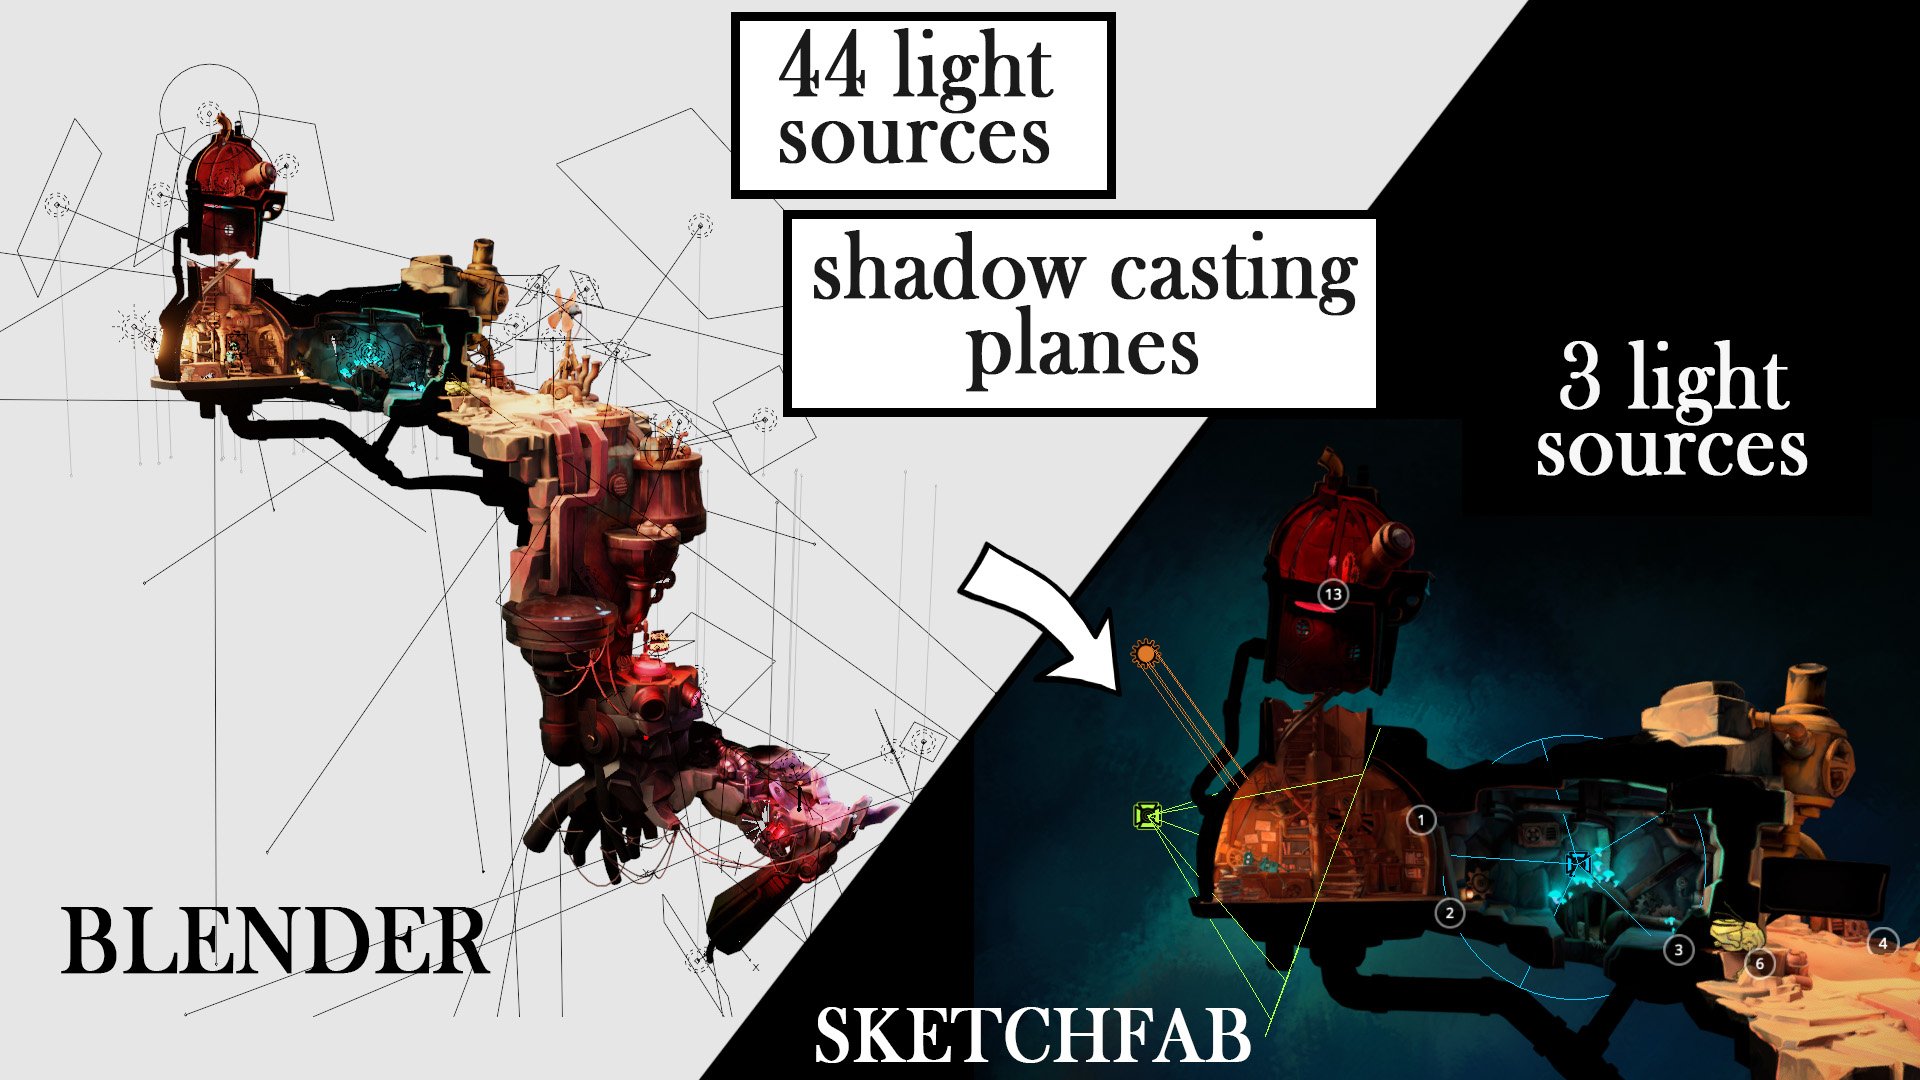
In Blender, we lit everything with over 40 light sources, each of them contributing an indirect lighting pass. We had our direct light (Sun) blocked in the lower parts of the level as well as in the cave area. Large shadow-casting planes, invisible to the camera, were added to achieve this. Sketchfab, however, doesn’t have invisible shadow casters and allows for up to only three light sources that don’t support indirect lighting.
Having just three light sources available was ‘solved’ by baking all the indirect lighting from Blender into the separate textures (later included in the scene as emissive). This way in Sketchfab three key lights would be responsible for the direct lighting and real time shadows, while all of the indirect light is faked by the indirect lighting baked into the emissive of all materials. As the baking goes, you can do it just like any other bake—with Cycles engine: select the object, create an empty texture, select it and then in the properties tab under render/bake choose “Combined” and uncheck “direct” lighting. It gives beautiful (but quite dark) results.
Not having invisible shadow casters forced other workarounds. You see, the surface gets lit by the real-time lights inside Sketchfab and it will receive more light if it has bright Base Color (BC) and higher specularity (spec) values. If you want the real-time lights to be ineffective, you have to reduce values of those maps and bring more light through the emission (EM) slot, which does not interact with the real-time lights at all. Besides that, the lighting has to be baked in Blender with the shadow casters enabled. Keep in mind that objects in the scene have to have at least one of the following: EM (self lit) or BC+spec (receiving light), but preferably both. If the surface has dark values in all of those, it will be dark no matter how strong a light is shining upon it. More complexity arises when objects need to move across differently lit areas. For now, Sketchfab doesn’t offer a perfect solution but a careful balance of the emission and receiving light from available light sources as well as the HDRI is a way to go.
Animations
All this effort, that had been taken to ensure the theme, feel and the very mood of this imagined cute and clunky world, simply demanded from us to further complement and amplify that same vibe with an appropriate animation style. In general, animation is a huge portion of the design! Since every object radiates a certain flavor of presence in the world, so does its animated behavior. Here is where our inner child was set loose in the very best of ways! We went for expressive and stylised, rather than realistic and rigid, even though we did want it to feel believable, even if not strictly physically accurate. We went for playful moves that have their own mass, momentum and an obvious visual intention, as often as possible! All these aspects together, are what ultimately projects a unified, homogenous and consistent overall expression.
Animation of Spark walking down the steps of his cave.
Regarding the strictly technical aspects, we achieved these things using keyframe animations and also diving deeper in Blender’s Graph Editor. The Graph Editor may at first feel like a jungle of hot mess, however once you look deeper and work with it a bit more, its power can feel quite creatively seductive. These animations were far more than just simplistic “A to B” movements, and much more of a fun curve-tuning stunt-work into the balance here, a delay there, and/or a different interpolation there and so on, and so on, until we felt happy with the results. Across the entire project, Blender has proven to be a fantastic instrument for achieving such fine-tuned finesse, whenever such an approach was needed.
Simulations
The bursting steam was done with a simple particle simulation where each particle was an instance of an object (slightly curved plane with a smoke particle texture). The particle simulation was then converted into keyframed objects (slightly over 200 meshes) and further tuned with curves in the Graph Editor. Curves were simplified (with option Decimate Keyframes) to reduce the amount of keyframes.
Another type of simulation in this project was rigid body physics. Surprisingly, out of all physical objects only the letters falling from the sign used the simulation. All of the falling washing machine parts as well as loose parts of the humanoid robot (Spark) were ‘simulated’ by hand. The reason for this? Control. The same applies to the ropes – we could have simulated them with soft physics and then baked motion into the Shape Keys. Instead, bones were added and controllers were placed at the middle of each rope. These controllers transferred motion onto the curves and they transferred it onto the bones (with Spline IK constraint) and those moved the geometry of the ropes (armature with weight-painted groups). The motion of the controllers was elliptic, which gave the most believable look and let us control all ropes independently.
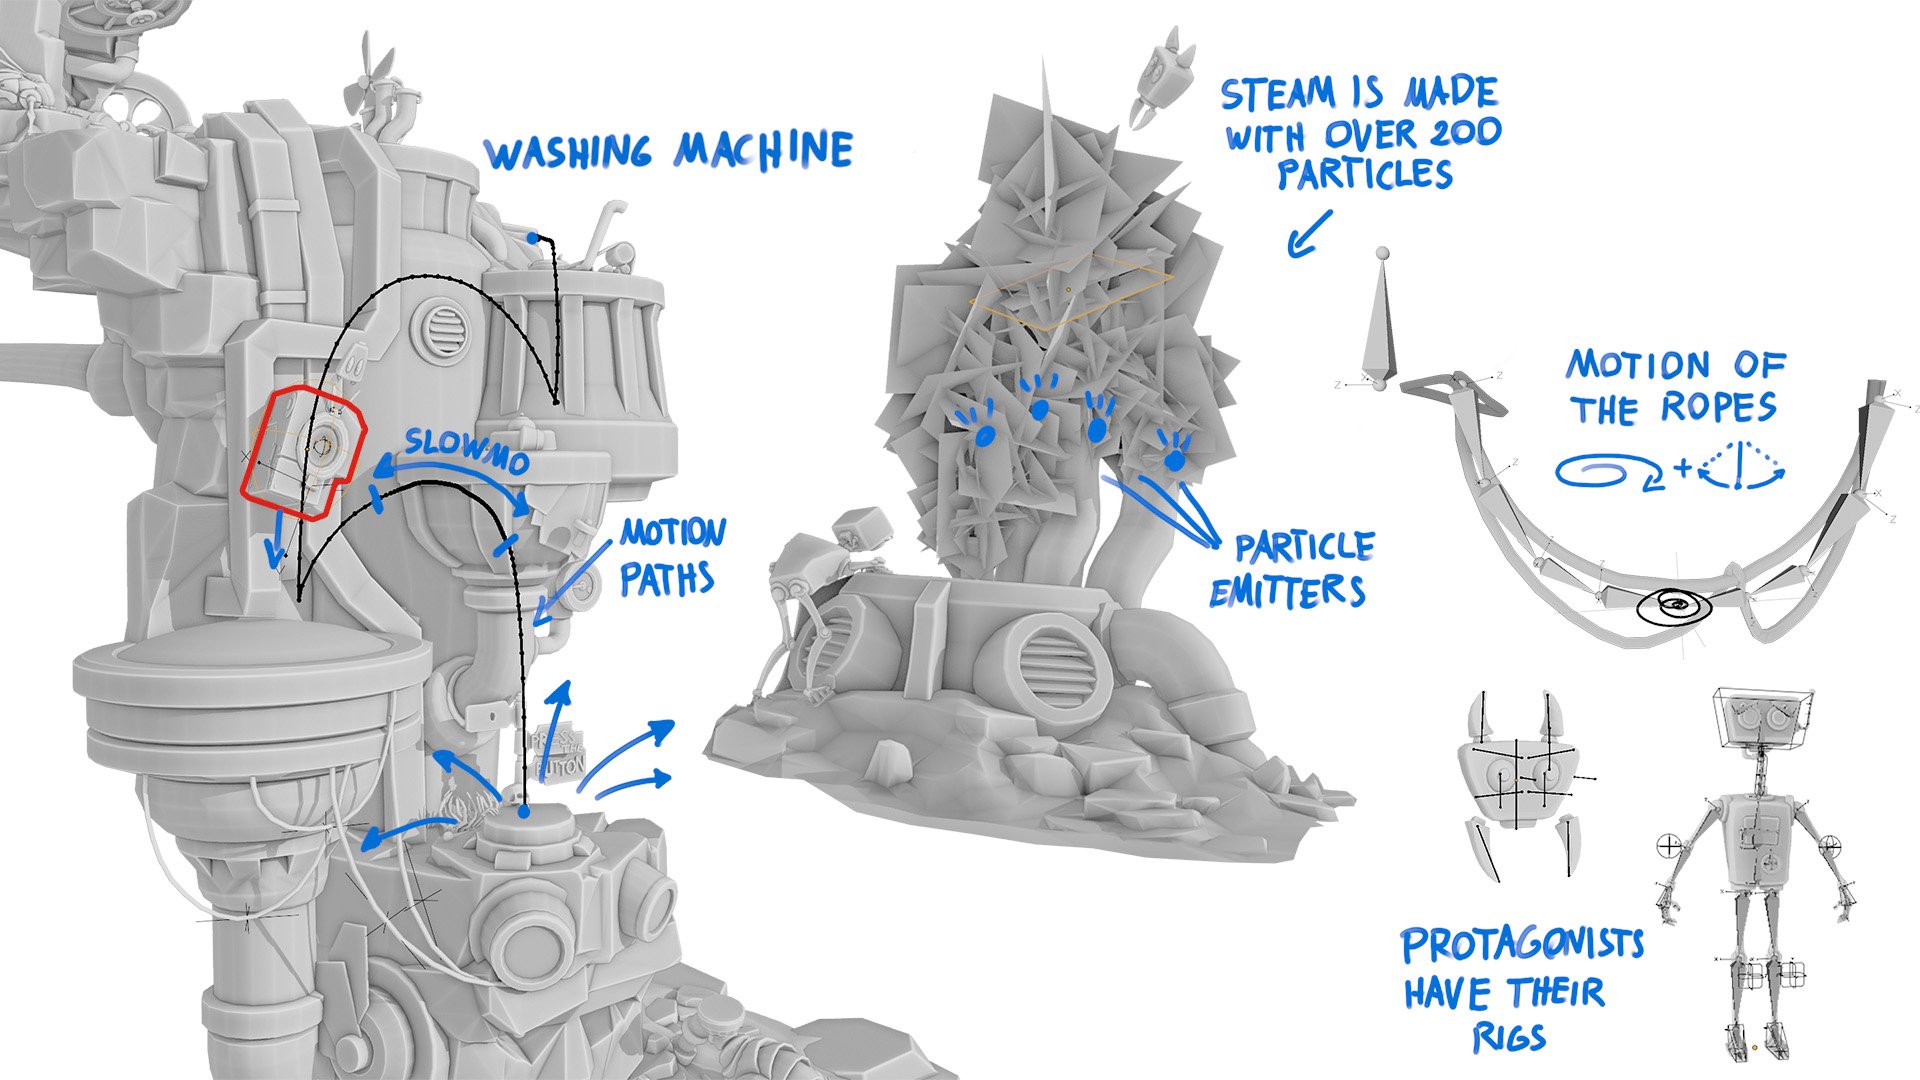 Some of the types of animations in the project. Motion paths were useful for the trajectory of falling objects.
Sketchfab setup
The scene was exported from Blender as an .fbx with animations baked and simplified. This simplifying algorithm can be a bit extreme (causing inaccurate motion, clipping and sliding) so the value of simplify was set low, to around ‘0.1′.
After the upload, the scene was performing rather well but there was still room for optimization. Topology in remote areas was decimated further and the triangles that were invisible to the viewer were removed entirely. All objects that could be merged, were merged (Sketchfab performs better with lower amount of objects) and all textures that could be further optimized were reduced. After that, the scene got reuploaded on Sketchfab.
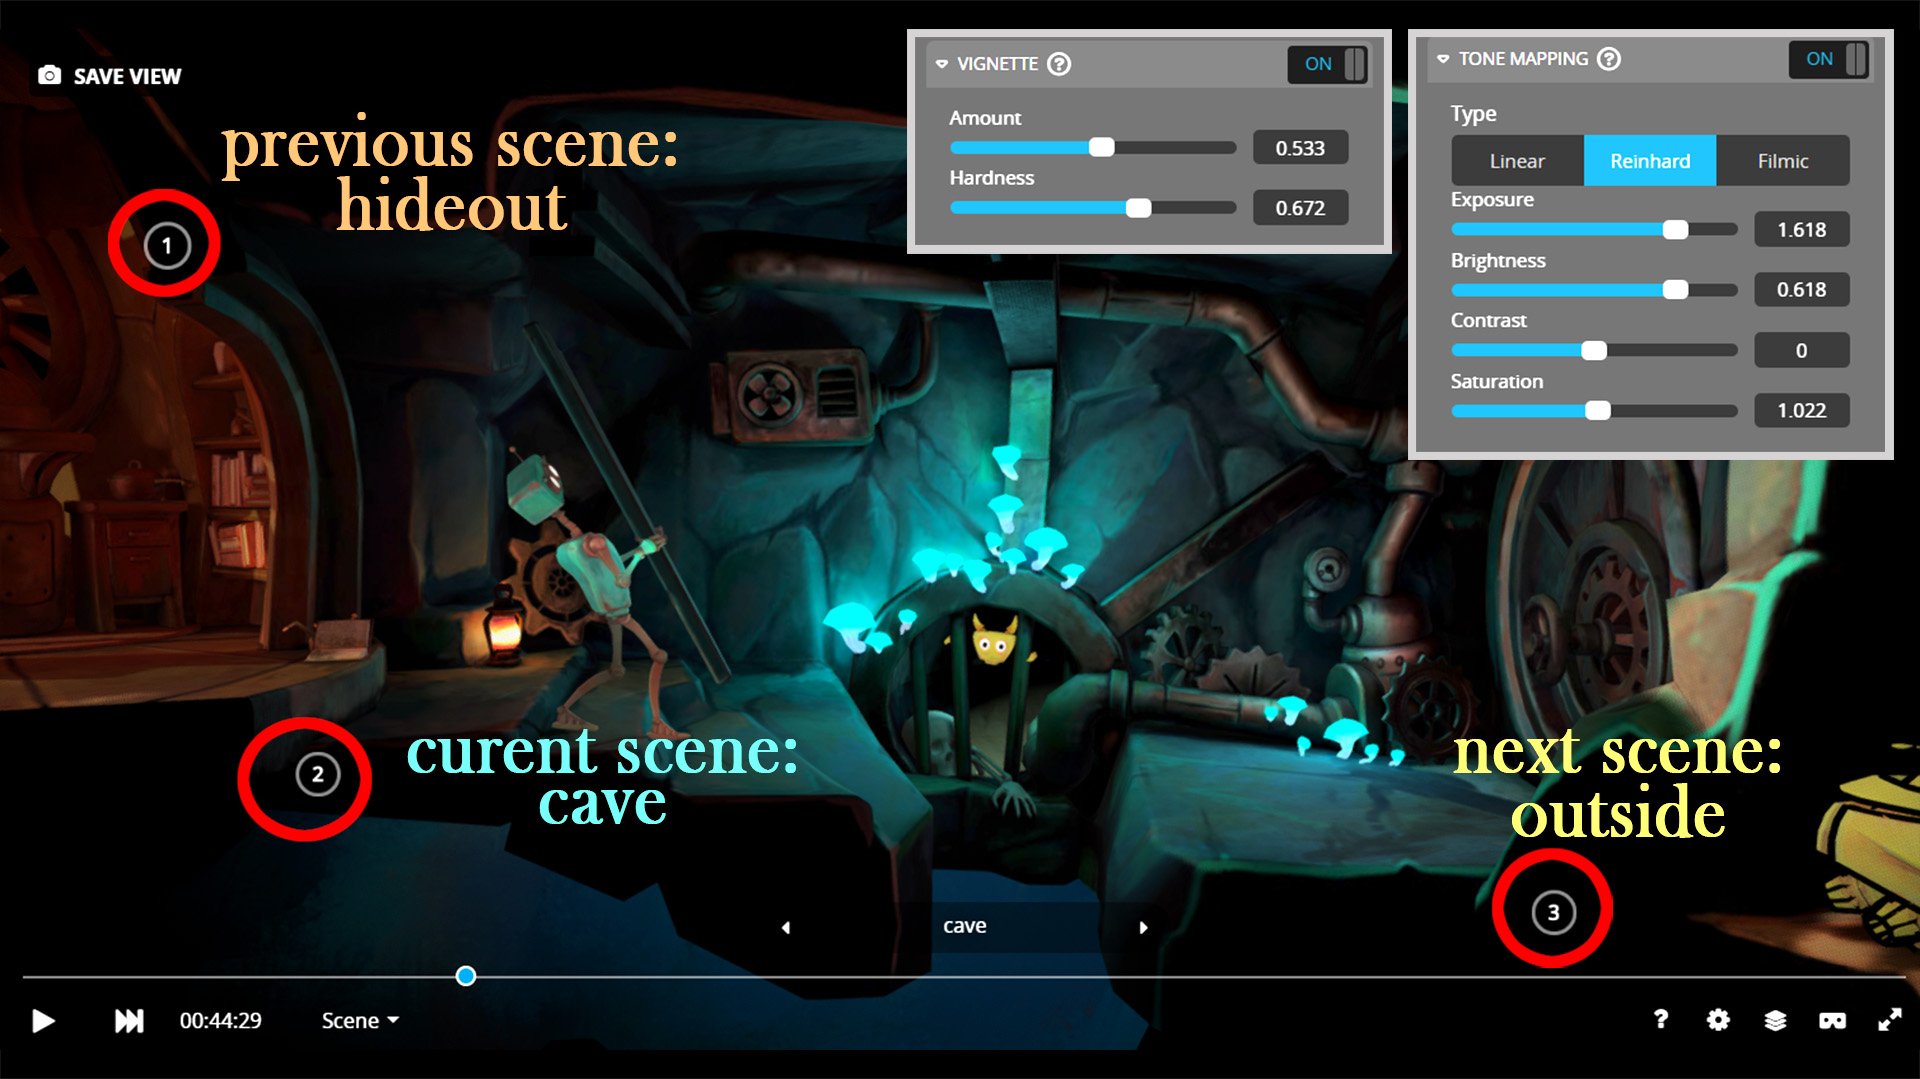
As the post-processing goes, the scene does not use SSAO (it doesn’t need it, due to the nature of the baked indirect lighting and painted light values) and it also doesn’t use sharpness nor screen space reflections (they look a bit glitchy on animated scenes and cause strong performance drops). There is instead some tone mapping and subtle vignette added. The sparse setup of post-processing gave us better performance.
An important part of the scene was the annotations. They help the viewer navigate the scene in such a way that every perspective (or frustum) gives the viewer at least two annotations to use—one to go back to the previous scene, another to proceed forward.
Why Sketchfab
Sketchfab’s engine offers real-time previews of 3D animated art. It allows combining PBR with NPR (Non Photorealistic Rendering)! With big projects like Spark & Bibi there is no avoiding mistakes and imperfections during the first upload. Fortunately, Sketchfab allows for a reupload. The movie was updated eight times after it was released (like a good soup, it gets better with time!).
As for the future…
You are now ready to create your own 3D movies! And if you can code, with API it might be possible to have the viewer directly influence the story unfolding in front of viewers’ eyes. This will be the next step. We are looking forward to seeing you there! Good luck!
